Audiovox SMT 5600 User Manual
Browse online or download User Manual for Smartphones Audiovox SMT 5600. Audiovox SMT 5600 User's Manual
- Page / 20
- Table of contents
- BOOKMARKS
- SMT 5600 1
- THE QUICK LIST 10
- CONTACTS 10
- THE KEYPAD 10
- STATUS INDICATORS 10
- ANSWERING A CALL 12
- ENDING A CALL 12
- CREATING A PARTNERSHIP 12
- MAKING A CALL 12
- INSTALLING THE BATTERY 14
- INSTALLING THE SIM CARD 14
- INSTALLING A MINI SD CARD 14
- LOCKING YOUR SMARTPHONE 14
- CAMERA MODE 15
- CHOOSING A CAPTURE SUBMODE 15
- CAPTURING A STILL IMAGE 15
- HANDSET DESCRIPTION 16
- SSMMTT 55660000 17
- AAcccceessssoorriieess 18
- SSppeecciiffiiccaattiioonnss 19
Summary of Contents
AUDIOVOX SMT 5600 SMARTPHONEQUICK START GUIDESMT 5600IMPORTANT - READ THIS FIRSTThis guide is designed to get you quickly up and running with your Win
WWhhaatt YYoouu NNeeeedd TToo KKnnooww10WWhhaatt YYoouu NNeeeedd TToo KKnnooww9The top of the Home screen displays icons for the fiveapplicati
WWhhaatt YYoouu NNeeeedd TToo KKnnooww10WWhhaatt YYoouu NNeeeedd TToo KKnnooww9The top of the Home screen displays icons for the fiveapplicati
GGeettttiinngg SSttaarrtteedd8WWhhaatt YYoouu NNeeeedd TToo KKnnooww11STEP 6:STEP 6:RECORD YOUR WIRELESS PHONE NUMBERYour account was set up when
WWhhaatt YYoouu NNeeeedd TToo KKnnooww12GGeettttiinngg SSttaarrtteedd7STEP 4:STEP 4:INSTALLING ACTIVESYNCBefore synchronization can begin, you mu
GGeettttiinngg SSttaarrtteedd6WWhhaatt YYoouu NNeeeedd TToo KKnnooww13STEP 2:STEP 2:INSTALLING THE BATTERY1. Insert the battery by aligning the e
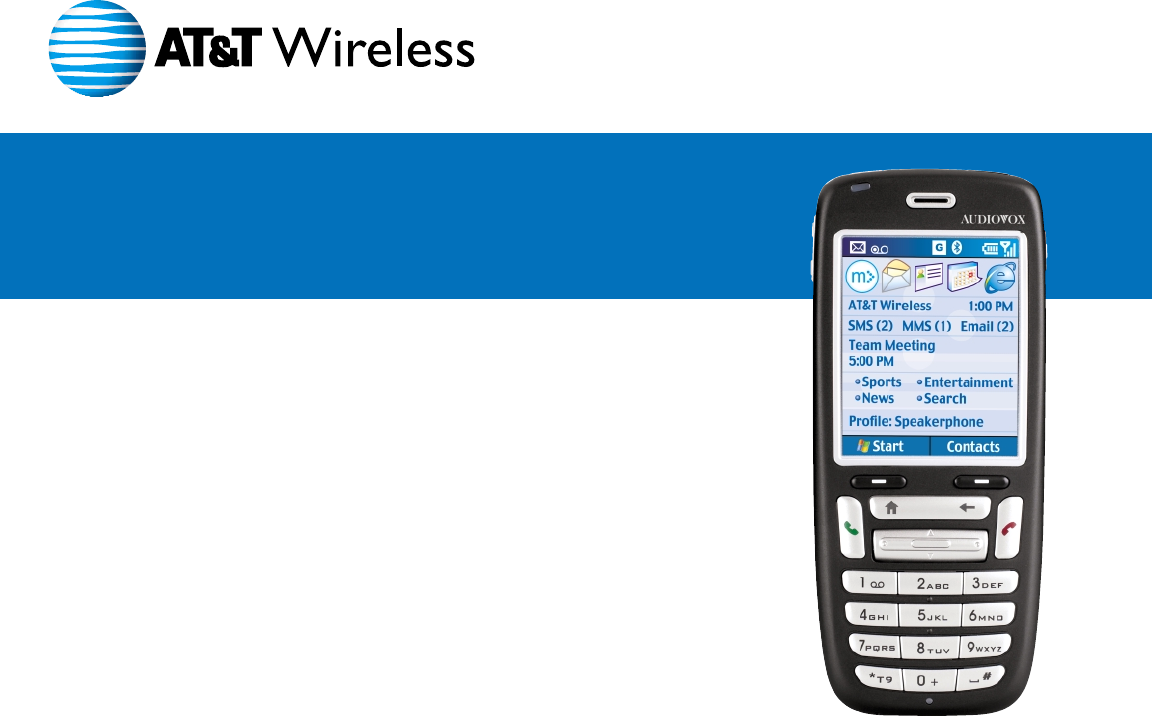
WWhhaatt YYoouu NNeeeedd TToo KKnnooww14GGeettttiinngg SSttaarrtteedd512. END BUTTON: Press to end a call; or press and hold to lock the keypad.1
GGeettttiinngg SSttaarrtteeddWWhhaatt YYoouu NNeeeedd TToo KKnnooww1541. POWER BUTTON: When your smartphone is turned Off,press and hold the Powe
WWhhaatt YYoouu NNeeeedd TToo KKnnooww163PACKAGE CONTENTSThank you for purchasing the SMT 5600.The device’s gift box contains all of the items lis
2AAcccceessssoorriieess17IMPORTANTIn order to utilize your device’s wireless data and voice capabilities, you must have anAT&T Wireless SIM card.T
SSppeecciiffiiccaattiioonnss181Technical Specifications:Network Frequency: Tri-Band GSM 850/1800/1900Dimensions: 4.24" h x 1.82" w x .69&quo
SSppeecciiffiiccaattiioonnss181Technical Specifications:Network Frequency: Tri-Band GSM 850/1800/1900Dimensions: 4.24" h x 1.82" w x .69&quo
AUDIOVOX SMT 5600 SMARTPHONEQUICK START GUIDESMT 5600IMPORTANT - READ THIS FIRSTThis guide is designed to get you quickly up and running with your Win
2AAcccceessssoorriieess17IMPORTANTIn order to utilize your device’s wireless data and voice capabilities, you must have anAT&T Wireless SIM card.T
WWhhaatt YYoouu NNeeeedd TToo KKnnooww163PACKAGE CONTENTSThank you for purchasing the SMT 5600.The device’s gift box contains all of the items lis
GGeettttiinngg SSttaarrtteeddWWhhaatt YYoouu NNeeeedd TToo KKnnooww1541. POWER BUTTON: When your smartphone is turned Off,press and hold the Powe
WWhhaatt YYoouu NNeeeedd TToo KKnnooww14GGeettttiinngg SSttaarrtteedd512. END BUTTON: Press to end a call; or press and hold to lock the keypad.1
GGeettttiinngg SSttaarrtteedd6WWhhaatt YYoouu NNeeeedd TToo KKnnooww13STEP 2:STEP 2:INSTALLING THE BATTERY1. Insert the battery by aligning the e
WWhhaatt YYoouu NNeeeedd TToo KKnnooww12GGeettttiinngg SSttaarrtteedd7STEP 4:STEP 4:INSTALLING ACTIVESYNCBefore synchronization can begin, you mu
GGeettttiinngg SSttaarrtteedd8WWhhaatt YYoouu NNeeeedd TToo KKnnooww11STEP 6:STEP 6:RECORD YOUR WIRELESS PHONE NUMBERYour account was set up when
© 2020, manymanuals.com. All rights reserved. | 1.075 s |
 Manymanuals.com
 Manymanuals.de
 Manymanuals.fr
 Manymanuals.it
 Manymanuals.pl
 Manymanuals.cz
 Manymanuals.es
 Manymanuals-pt.com
Comments to this Manuals